


Onigiri are the quintessential Japanese snack food. In essence, they’re little more than compressed rice, but with the addition of spices and other mix-ins they can become exciting in their endless permutations.

These are great to make with leftover rice from a meal to avoid waste, or you can do what I did and make a whole batch just for snacking. 
First, you need rice. I made 2 cups of brown rice using a rice cooker. If you’re not using a rice cooker, I would suggest using this sushi rice recipe. Since this is brown rice instead of the white rice used in the recipe, soak the rice first for an hour and then cook it for an hour.
I put the rice in a wide baking dish to cool off while I applied a seasoning of salt, mirin, and rice vinegar. Then I added the seaweed on top.


I used a mixture of 4 things in this seaweed seasoning: dried arame, dulse, nori-kome furikake, and black sesame seeds.

Make sure to soak the arame until pliable, at least 15 minutes. Then just mix it all in evenly and get ready to mold the rice into tight little triangles!
Run your hands under the faucet to get them soaking wet. This will keep the rice from sticking to your hands. Scoop up a full handful of rice and compress it into a ball. Don’t give it your worst death grip, just press enough to keep it together.
Now the fun part. With the ball of rice in your left palm, cup it so that your fingers and palm make the flat sides or “faces” of the triangle while forming your right hand into a peak shape to make the top of the triangle.

Press all over in this position, then rotate and press again. Once more and you should have the signature triangle onigiri shape!


Now that you have all of your onigiri formed, you can choose to eat them as-is or toast them like I did. Lightly spray a non-stick pan with a flavorless oil such as canola and add the onigiri.

Flip them once they get to a golden brown, about five minutes on each side. Not too much longer than that or they’ll get a crust on them that’s hard as a rock.

That’s all there is to it. You can store these in the refrigerator for a very long time, just keep them covered to keep them from drying out. They make great additions to school lunch boxes and are a tasty vegetarian sushi alternative.


You can put any seasonings you want in these. If seaweed is not your thing, try flaked salmon or crumbled bits of hard boiled egg. Throw in leftover used tea leaves or eat them completely plain, dipped delicately in soy sauce.
Toasted seaweed and brown rice onigiri
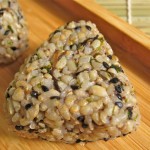
A healthy snack of brown rice seasoned with seaweeds.
Prep Time: 20 minutes
Cook Time: 35 minutes
Total Time: 55 minutes
Ingredients
- 2 cups brown rice
- 1 tsp. mirin
- 1 tsp. rice vinegar
- big pinch of salt
- 2 tbsp. black sesame seeds
- 1 tbsp. nori-kome furikake
- 1 tbsp. dried dulse flakes
- 1 handful crushed and soaked arame seaweed
Cooking Directions
- Cook brown rice in rice cooker or on stovetop.
- Mix together salt, rice vinegar, and mirin. Pour over hot rice and toss to coat.
- Add in soaked arame, dulse, furikake, and black sesame. Toss to combine.
- With soaking wet hands, pick up a handful of rice in your left hand. Form your right hand into a peak shape and press on top while pressing on the sides with your left hand. Rotate 2 times to form a triangle.
- If desired, toast the onigiri in a lightly oiled pan until lightly browned on both sides.

Delicious and healthy!

