Skip to Content

blog post

Broiled grapefruit with ginger sugar

Ok, I need a break from talking about the book for a while. I’m sure you guys are ready for something new too. 😉

Who’s ready for spring?!! I don’t know about you guys but I am counting down the days until short sleeves, sunny walks, and refreshing warm-weather fruits. I’m craving berries. Every time I go to the farmer’s market and pass the table packed with those little green plastic cartons overflowing with plump red strawberries, I have to force myself to keep walking and not fall for their ruse. It is not berry season. Those strawberries will be watery and sour and unsatisfying.

Right now I’m combatting this need for refreshing fruit flavors with the last of winter’s citrus. I just annihilated an entire red grapefruit with lunch, sliced into wedges like an orange, making little smiles of rind as I chomp down on each one. I never eat grapefruit like that for some reason. I always see grapefruit served so preciously, either sliced into thin naked supremes on top of a fragile salad, or as I’ve chosen to serve it in the recipe I’m sharing with you today – broiled with a sugary crust, each shining bite precisely carved out with a sharp little spoon.

sliced grapefruit

But you guys know I can’t just broil a grapefruit and be done with it, right? I’ve gotta find a way to insert one of my favorite asian flavors in there somehow. This is a common springboard for me as far as recipe creation goes – I take an already delicious food and make it marvelous with a fun new flavor.

This time, I’ve used spicy grated ginger to balance with the sweet sugar and bitter grapefruit. I debated for a long time wether or not to feature ginger as one of the highlighted ingredients in The Japanese Pantry, and ultimately decided to let it play a supporting role instead. It certainly shines in this recipe though.

ginger sugar

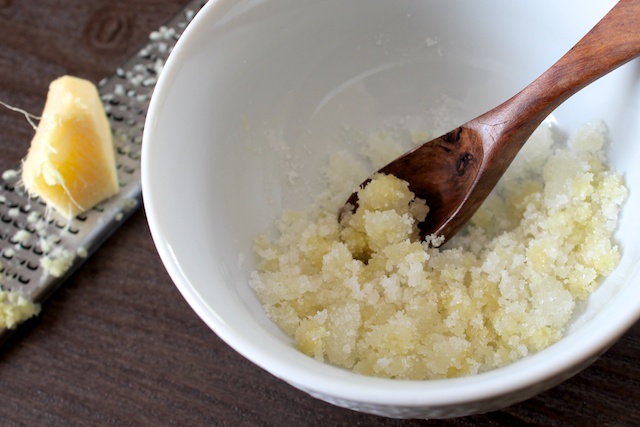
I loved the smell of the ginger sugar as I was making this. The fresh wetness of the grated ginger soaked right into the sugar, lightly dissolving it into the texture of wet sand. It makes a grainy slushing sound as it mixes together, like the sound of walking through melting snow.

ginger sugar

I ended up broiling this in a toaster oven. I tried it once before in a regular oven and the fruit was too far from the heating element, it just kind of melted rather than caramelizing. This time though, the toaster oven crisped the topping up nicely and just barely browned the edges. I love how the fruit blisters in the heat and bulges up out of the rind. The ginger flavor was definitely present but not at all overpowering.

Broiled grapefruit with ginger sugar

I must confess though, that even with this typically “precious” presentation, it was not eaten daintily. I hacked it up with my blunt little spoon before turning it inside out and biting the rest off in big chunks until only a ragged pithy peel was left. It definitely satisfied my desire for summery flavors. I see myself having this bright little breakfast weekly until my beloved berries are finally ready.


Broiled grapefruit with ginger sugar

Gingery sugar encrusts juicy bitter grapefruit for a sweet and lightly spicy treat.

Prep Time: 3 minutes

Cook Time: 12 minutes

Total Time: 15 minutes

Ingredients

  • 1 medium red grapefruit
  • 2 tbsp. white sugar
  • 1 tsp. freshly grated ginger

Cooking Directions

  1. Slice grapefruit in half, remove any large seeds, and place cut side up on a heat safe dish or tray lined with aluminum foil.
  2. In a small bowl, mix together ginger and sugar until it is the texture of wet sand.
  3. Top each grapefruit half with half of the sugar mixture and pat with the back of a spoon to spread it out to the edges.
  4. Toast in a toaster oven for 12 minutes or until bubbly and lightly browned. (The toast setting on my toaster oven only goes up to 6 minutes, so I just left it in for 2 cycles.)


Are there any spring and summer foods you’re desperately craving?


blog post

How to self-publish a book – Part 2: Anthologize and CreateSpace

In part 1 of this series I discussed the huge realization I had that writing a book was going to be actual work. I have no idea how I got it in my head that I could just bang out quality content with no real plan and without any professional equipment or skills. Ha!

One of the first things I realized I would need to upgrade was the organization of the content I was creating. I had a random Google Doc filled with clusters of notes about various Japanese ingredients, a folder in iPhoto with all of the pictures I’d taken that had been edited to the best of the software’s ability, and some vague ideas in my head about what each page of the book would need to say and how it would all look. It was obvious that I needed to start pulling all this various stuff together and start laying it out closer to how I would display it in the book. Enter, Anthologize

Anthologize

Anthologize is a free WordPress plugin that allows you to write a book as if it were a series of blog posts. You can either use it to pull together existing blog content into a book format, or you can create new content by making a separate draft page for every page of your book and filling it with new material. I found it really helpful because I didn’t have to learn anything new to use it. I could write each page as if I were writing a blog post, laying out all the text and photos as I thought they might appear in the final book. I still have all the draft posts on my blog from when I was using Anthologize to write The Japanese Pantry, and I’ve even started my next two writing projects with it, using it to store my notes and ideas until I can start putting them into action.

I have to say that Anthologize is not perfect. It can be a bit slow to load changes and it’s somewhat cumbersome to go make a blank post draft first and then go into Anthologize and add it to your project. I would not recommend it for a book that has many parts or chapters. Mine had about 30 parts that I frequently needed to make changes to, and I’d say that was about the limit of how many parts I would be able to manage in this format. It is, however, free. It’s also much better than the scattered mess of book content I was dealing with before. I may look for something else to use once I start headlong into my next writing project, but I may not.

The other thing I needed to decide on before I could move forward was what service to use for publishing. I started out with a self-publishing service called Lulu, which is one of the more well-known and widely used online publishing tools. After trying to fit my content into some of their book-writing templates and looking at their costs, I decided that Lulu was not going to work for this particular project. I didn’t like any of the book layouts I was being forced into, I found the workflow tedious and confusing, and I was going to have to price my finished book very high to make any profit. After some more shopping around, I came upon my current self-publishing service – CreateSpace

CreateSpace


I decided to go with CreateSpace for several reasons. They’re owned by Amazon.com so they come equipped with a reputable sales channel that many people already use and feel comfortable buying from. Their production costs are low and their cut of the royalties is very reasonable; the author also has full control over setting the sales price to insure they receive an adequate royalty on each sale. There is an author dashboard that helps you keep up with all of the steps that need to be completed to make a book ready for sale…


checklist


CreateSpace also offers services for designing a book cover, laying out your book content, and marketing the finished work – all optional at an extra cost. You can even make a Kindle-ready version of your book fairly easily. Also, you can purchase an ISBN number (the unique numbers around the book’s barcode that serve to identify it electronically) for a drastically reduced cost through CreateSpace, as opposed to purchasing one directly from Bowker, the company all books published in the U.S. are registered with.

Unlike Lulu though, you cannot compose your book directly on the CreateSpace website. You must write it using your own software and then upload it in an appropriate format to CreateSpace. Once uploaded though, CreateSpace can check it for printing errors online using their Digital Proofer feature. It allows you to flip through your book as if it were sitting right in front of you, but with helpful annotations showing you exactly where you need to make adjustments to make your book files printable. It’s a little buggy though, and often shows errors that truly don’t exist. If you’re confident that you’ve fixed any real issues, you can skip this step and have it reviewed by an actual human to confirm that it is indeed printable.


Digital proofer


All in all I’ve been really happy with CreateSpace and will absolutely use them for any future self-publishing I do. Their customer service was able to help me with some issues I was having, and there are tons of support forums that will answer nearly any question you can think of. I would highly recommend them if you ever decide to self-publish a book of your own.

That was a long one! In the next part of this series I’ll talk about photography – how I improved my skills and what equipment I used.


blog post

How to self-publish a book – Part 1: Getting serious

When I first mentioned that I was writing a book, I had a lot of people ask that I share some of the process of writing it as I went along. Well…that didn’t happen. I got really caught up with a lot of stuff at the end of last year and I don’t think I even touched this blog for nearly 6 months. Now that it’s done and I can breathe again, I’m ready to walk you through some of what I did to make it happen. In this first part I talk about my early struggles and realization that this was not going to be a cake-walk after all…

Before I started writing The Japanese Pantry, I really had no idea what I was getting myself into. I thought I’d test a few recipes, write a few blurbs of text, take some photos, and then somehow it would just magically all come together into the shape of a book and be ready to go. Nope.

I still remember how I started. I collected some rudimentary research on different Japanese ingredients into a Google Doc, started buying a few of those ingredients and tried to photograph them in my rickety lightbox with a point-and-shoot camera, and even tried to photograph a few plated recipes with no props and in terrible basement lighting. Everything I did looked horrible, and the more I saw myself produce this sub-par content the more I began to doubt that writing a book was even within the realm of my abilities.

One night at our favorite bar, I vented to Jeff all of my doubts and frustrations. I was nearly in tears, having resigned myself to the fact that this just wasn’t going to work and I should stop while I’m ahead and go get a part-time job. After much discussion, we both agreed that what I really needed to do was to get serious. If I was going to do this, then I was going to do it professionally, and that meant investing more of my time, passion, and yes – money, to make a beautiful product.

One of the first things I did with my newfound enthusiasm was go out and buy props. I bought a few yards of different colored fabrics to use as backdrops, colorful napkins and placemats, little Japanese-themed knick-knacks, and of course a bunch of plates, bowls, and other serveware. It wasn’t cheap, but I made sure to buy things that I knew I could use again in blog photographs as well as around the house to actually eat off of. I also already had a stack of colorful origami paper that I knew I could use to liven up a drab scene in a pinch.

Origami Crane

My composition improved greatly with these new additons to the scene, but I was still dealing with bad basement lighting and a camera that was not designed to take the type of photos I was trying to achieve. The news that we would be moving to a new house with lots of great natural light gave me the hope that there was still a chance that I could make this work. With a few months to go until the big move, I busied myself with doing more research and taking photos of ingredients in my lightbox with the new backdrops and some light kits we bought at Home Depot – photos like this one…

Matcha

You may think that looks great and that I was being too hard on myself, but what you’re looking at there is the final version of that photo after lots of careful editing. Here’s the original for comparison…

Unedited matcha photo

Yikes! It was clear to me that both the hardware and software I was using just weren’t going to cut it. The level of adjustments I was able to make with my computer’s default photo editing software could only do so much. It was time to take the plunge and buy some new toys…

In the next part of this series I’ll go over a few of the first tools I used to improve quality and workflow. Stay tuned!

Are there any specific questions you’d like me to answer in this series as I go along?