If you’d like to follow along with the whole process: Check out how I made the strawberry jam filling, watch me work with fondant, add the finishing touches, and see the finished cake!
So that was the jam, but I also used Monday to whip up 6+ pounds of buttercream frosting. Sounds like a lot, but it’s actually really quick and easy to make, only I had to do it in 3 batches because it wouldn’t all fit in the mixer at one time.

For a 2 lb. batch of vanilla buttercream which can be multiplied easily…
Crusting No-Melt Vanilla Buttercream
Ingredients
- 2 sticks (226 grams) room temperature unsalted butter
- 12 oz. (340 grams) unflavored vegetable shortening
- 1/2 tsp. salt
- 2 tsp. vanilla extract
- 2 tbsp. milk or cream
- 2 lbs. (32oz., 907 grams) powdered confectioner's sugar
Cooking Directions
- Beat together butter and shortening until pale and glossy.
- Add salt and vanilla and mix in.
- Add in powdered sugar a little at a time on low speed, beating on a higher speed between each addition to fully incorporate.
- Add milk and mix on low, then beat on high until frosting is pale and fluffy.
- Store covered in the refrigerator and allow to come to room temperature again before using.
Now, I normally wouldn’t touch shortening with a ten foot pole for my baking projects, but it is absolutely invaluable for frosting cakes that may be exposed to hot, humid weather for long periods of time. This is; of course, a major concern in Georgia, and sure enough Caitlin’s cake ended up sitting out in the 80+ degree weather for a few hours before it was cut into. The fondant on the outside of the cake suffered a bit, but the buttercream inside refused to melt. Shortening may be unhealthy, greasy, and take away some of the rich butter flavor of an all-butter frosting; but while it may start to get glossy in the heat, it just won’t melt. And you know, the finished frosting tastes really good too, so I’m not going to complain.
Anyway, the next day I got to baking the cake layers so I’d have somewhere to put all that frosting and jam. For the next few days, I only got pictures of baking the biggest tier, and frosting the smallest tier; so though the pictures below happened on different days they’ll still give you the idea of the flow of things.

I used the same vanilla cake recipe as last time because it’s really simple to prepare, it makes a sturdy and durable cake, and it has a rich buttery flavor. It’s a little denser than a typical wedding cake, but I personally enjoy the texture. It just tastes and feels more homemade.
Here’s the recipe I use that will fill two 9-inch pans…
My Favorite Vanilla Cake
Ingredients
- 2 sticks room temp. unsalted butter
- 2 cups white sugar
- 4 large room temp. eggs
- 4 tsp. vanilla extract
- 3 cups all-purpose flour
- 3 and 1/2 tsp. baking powder
- 1 cup room temp. milk
Cooking Directions
- Butter and flour two 9-inch baking pans and set aside.
- Cream together butter and sugar until pale and fluffy.
- Add vanilla, then eggs one at a time, mixing between each addition.
- Sift together flour and baking powder and add to batter in 3 additions, mixing between each.
- Slowly pour in milk while batter mixes on lowest speed, then beat on medium-high for several seconds to fully incorporate.
- Pour into baking pans and spread evenly with a spatula. Bang bottom of pans on a hard suface a few times to bring any air bubbles to the top of the batter.
- Bake in a pre-heated 350 degree oven for 40 minutes.
- Allow to cool in baking pans until pans cool enough to handle, then turn out onto cooling racks and allow to come to room temperature before use.
This recipe can also be halved, which comes in handy for the smaller tiers of cake which use one and a half batches to fill two 6-inch pans.
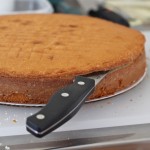
So after the cakes are completely cool, they get a haircut. The puffy muffin tops get sliced off and the brown crust is removed from the undersides of any layers that face the center of the cake.

My favorite way to do this is to use a small pairing knife first to make an incision all the way around the cake, then I take a longer knife and sweep towards the middle from all sides until the muffin top slides right off. At this point you should break off a slice of muffin top and slather it with frosting so you can “test it for deliciousness.”
As you can see above, the bottom layer is on a round of cardboard for ease of moving it around and for added stability.

For the smallest tier of cake, I was able to just bake two really tall layers and slice them each in half for 4 total. I wouldn’t try this trick with the bigger layers though, they’d be too heavy and flimsy and just break apart. It’s hard enough to move them around without breaking as it is.
Time to frost! I decided to get all fancy and purchase a cake decorating turntable this time around. Best $20 I could have spent. It made frosting so much easier and I’ll definitely still get use out of it for other baking projects throughout the year.

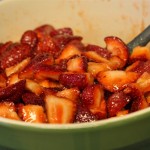
Layering with more frosting, a big dollop of jam, and piled high with yet more frosting to start the crumb coat…


The crumb coat is a thin layer of frosting that helps to seal in the moisture and crumbs. It keeps your cake fresh and spotless. You basically just glob on frosting all over, then use either an offset spatula or scraper tool to scrape it all back off. This is also when you want to pay attention to how your cake layers are lined up; once you put it into the fridge for the buttercream to crust up, there’s really no more moving them around.

After about about an hour in the fridge for the buttercream to crust (become slightly hard and crispy) I took it back out to frost. It’s the same technique as the crumb coat, only you apply less pressure when removing the excess frosting to leave more behind. At this stage you want to work to get the frosting as smooth as possible. Here mine is crusting up in the fridge. It’ll get one more polish with the scraper once it hardens to remove the last of the imperfections.

I also went ahead and made some bases for each layer to sit on out of some foam board from a shipping container and covered them in foil. Right now, this is the best solution I have for transporting my cakes undamaged. We have some plastic angled bracket things that velcro to the fabric material in the back of my car and we use those to corral the cake bases in place. They’re secured to the bases by a bit of double-sided tape. That makes it easy for me to pry them up, but hard for them to slide around.

So that’s it for the frosting. Next time we talk about my mortal enemy – fondant. My eyes are rolling back in my head just thinking about it.