


If you’d like to follow along with the whole process: Check out how I made the strawberry jam filling, watch me work with fondant, add the finishing touches, and see the finished cake!
So that was the jam, but I also used Monday to whip up 6+ pounds of buttercream frosting. Sounds like a lot, but it’s actually really quick and easy to make, only I had to do it in 3 batches because it wouldn’t all fit in the mixer at one time.

For a 2 lb. batch of vanilla buttercream which can be multiplied easily…
Crusting No-Melt Vanilla Buttercream
Ingredients
- 2 sticks (226 grams) room temperature unsalted butter
- 12 oz. (340 grams) unflavored vegetable shortening
- 1/2 tsp. salt
- 2 tsp. vanilla extract
- 2 tbsp. milk or cream
- 2 lbs. (32oz., 907 grams) powdered confectioner's sugar
Cooking Directions
- Beat together butter and shortening until pale and glossy.
- Add salt and vanilla and mix in.
- Add in powdered sugar a little at a time on low speed, beating on a higher speed between each addition to fully incorporate.
- Add milk and mix on low, then beat on high until frosting is pale and fluffy.
- Store covered in the refrigerator and allow to come to room temperature again before using.
Now, I normally wouldn’t touch shortening with a ten foot pole for my baking projects, but it is absolutely invaluable for frosting cakes that may be exposed to hot, humid weather for long periods of time. This is; of course, a major concern in Georgia, and sure enough Caitlin’s cake ended up sitting out in the 80+ degree weather for a few hours before it was cut into. The fondant on the outside of the cake suffered a bit, but the buttercream inside refused to melt. Shortening may be unhealthy, greasy, and take away some of the rich butter flavor of an all-butter frosting; but while it may start to get glossy in the heat, it just won’t melt. And you know, the finished frosting tastes really good too, so I’m not going to complain.
Anyway, the next day I got to baking the cake layers so I’d have somewhere to put all that frosting and jam. For the next few days, I only got pictures of baking the biggest tier, and frosting the smallest tier; so though the pictures below happened on different days they’ll still give you the idea of the flow of things.

I used the same vanilla cake recipe as last time because it’s really simple to prepare, it makes a sturdy and durable cake, and it has a rich buttery flavor. It’s a little denser than a typical wedding cake, but I personally enjoy the texture. It just tastes and feels more homemade.
Here’s the recipe I use that will fill two 9-inch pans…
My Favorite Vanilla Cake
Ingredients
- 2 sticks room temp. unsalted butter
- 2 cups white sugar
- 4 large room temp. eggs
- 4 tsp. vanilla extract
- 3 cups all-purpose flour
- 3 and 1/2 tsp. baking powder
- 1 cup room temp. milk
Cooking Directions
- Butter and flour two 9-inch baking pans and set aside.
- Cream together butter and sugar until pale and fluffy.
- Add vanilla, then eggs one at a time, mixing between each addition.
- Sift together flour and baking powder and add to batter in 3 additions, mixing between each.
- Slowly pour in milk while batter mixes on lowest speed, then beat on medium-high for several seconds to fully incorporate.
- Pour into baking pans and spread evenly with a spatula. Bang bottom of pans on a hard suface a few times to bring any air bubbles to the top of the batter.
- Bake in a pre-heated 350 degree oven for 40 minutes.
- Allow to cool in baking pans until pans cool enough to handle, then turn out onto cooling racks and allow to come to room temperature before use.
This recipe can also be halved, which comes in handy for the smaller tiers of cake which use one and a half batches to fill two 6-inch pans.
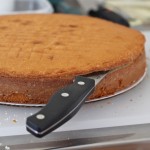
So after the cakes are completely cool, they get a haircut. The puffy muffin tops get sliced off and the brown crust is removed from the undersides of any layers that face the center of the cake.

My favorite way to do this is to use a small pairing knife first to make an incision all the way around the cake, then I take a longer knife and sweep towards the middle from all sides until the muffin top slides right off. At this point you should break off a slice of muffin top and slather it with frosting so you can “test it for deliciousness.”
As you can see above, the bottom layer is on a round of cardboard for ease of moving it around and for added stability.

For the smallest tier of cake, I was able to just bake two really tall layers and slice them each in half for 4 total. I wouldn’t try this trick with the bigger layers though, they’d be too heavy and flimsy and just break apart. It’s hard enough to move them around without breaking as it is.
Time to frost! I decided to get all fancy and purchase a cake decorating turntable this time around. Best $20 I could have spent. It made frosting so much easier and I’ll definitely still get use out of it for other baking projects throughout the year.

Layering with more frosting, a big dollop of jam, and piled high with yet more frosting to start the crumb coat…


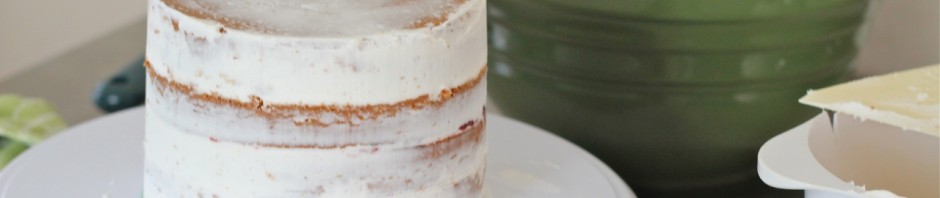
The crumb coat is a thin layer of frosting that helps to seal in the moisture and crumbs. It keeps your cake fresh and spotless. You basically just glob on frosting all over, then use either an offset spatula or scraper tool to scrape it all back off. This is also when you want to pay attention to how your cake layers are lined up; once you put it into the fridge for the buttercream to crust up, there’s really no more moving them around.

After about about an hour in the fridge for the buttercream to crust (become slightly hard and crispy) I took it back out to frost. It’s the same technique as the crumb coat, only you apply less pressure when removing the excess frosting to leave more behind. At this stage you want to work to get the frosting as smooth as possible. Here mine is crusting up in the fridge. It’ll get one more polish with the scraper once it hardens to remove the last of the imperfections.

I also went ahead and made some bases for each layer to sit on out of some foam board from a shipping container and covered them in foil. Right now, this is the best solution I have for transporting my cakes undamaged. We have some plastic angled bracket things that velcro to the fabric material in the back of my car and we use those to corral the cake bases in place. They’re secured to the bases by a bit of double-sided tape. That makes it easy for me to pry them up, but hard for them to slide around.

So that’s it for the frosting. Next time we talk about my mortal enemy – fondant. My eyes are rolling back in my head just thinking about it.


Yum! I love shortening frosting, it’s just as decadent to me as one that’s all-butter. Looking forward to seeing the evil fondant;)
Emma recently posted..cashew quinoa energy bars
I do love the flavor, but that stuff won’t wash off of anything!
If you ever need help testing deliciousness, just let me know.
Have you ever frozen the cake before icing to make it easier? I’ve heard that technique often but wonder if will affect the flavor/moisture level.
I do find that freezing the cake, at least the cake that I used, suffered texturally from being frozen. I’m sure if you started with a super-moist cake you’d be fine though. That would help the buttercream to crust faster though, so that could be a good idea.
Dear heavens, it’s so…. perpendicularly smooth! So very verr smooth and perpendicular! I’ve never used the word “perpendicular” in combination with an exclamation mark before. Life sure is surprising sometimes.
Your next mission is to use the word “tetrahedron” with a question mark. We’re all counting on you, Hannah.
Hi
I really like your site and I love your buttercream frosting but i would like to know if you have a recipe for crusting buttercream that doesn’t include shortening. I’m not a fan of shortening and i would like to make buttercream frosting that is all butter and no shortening but also crusts well. Is this even possible without including shortening? It seems as though all the crusting buttercream frostings i’ve come across include shortening. is this a necessary ingredient for the crust to form? I would really appreciate your feedback and expertise as I will be baking a cake with a request for no shortening crusting buttercream frosting. Thanks.
Hey Sarah.
From what I understand, shortening is used so often because it crusts at a higher temperature. 20 minutes in the refrigerator is all it takes to get that slight crispness on the outside. I’ve never tried it, but I think you might be able to get a crust on an all-butter buttercream if you were able to pop it in the freezer for a while, but you’d need to work very quickly with it while it’s out. You would also have to worry about climate ruining your hard work. If the cake gets too warm during transport or at the event, an all-butter buttercream can start to look glossy and melty and not hold it’s crisp edge. If you absolutely can’t use shortening, I’d try to keep the moisture content of the frosting really low. The more sugar you can pack into it, the crustier it’ll be. I think that’s the best you can do without getting into cooked icings. Keeping that cake cold for as long as possible should go a long way too.
Thanks for your response and insight. I have had all butter buttercream crust before but not as good as when the buttercream contained shortening. The all butter buttercream gives a slight or delicate crust. I also did realize that the more powdered sugar, the stiffer and more crusting the buttercream is. However, I try not to put too much powdered sugar to end up with a sickenly sweet frosting. I will try my best to do an all butter buttercream and hopefully the crusting will be sufficient. If I accomplish this feat I will let you know. Once again thanks for the quick response.
Hope it goes well, Sarah. I’d love to hear how it turns out!
If you’re trying to get stiffer buttercream without adding a ridiculous amount of powdered sugar, add meringue powder a tablespoon at a time after you get the buttercream flavor right. Keep adding until you get the right consistency and viola! Stiff buttercream that doesn’t instantly give you diabetes. You can usually find it in the cake decorating aisle of your grocery store. Not to be confused with the “Baking stuff” aisle, which is apparently different.
Nice tip! I’ll give that a shot next time.
Pingback: A proper crusting buttercream | Thyme Bombe
Hiya. I have been reading up a lot about buttercream and hopefully soon will try my hand at it. Googling around about buttercream I came across your site and I am interested in trying it out. My question regarding your recipe is more concerning measurements. You mention “sticks” of butter, how many grams are these per stick? Here in the UK the bars are 250g each. Also the oz. for the shortening how much is it in grams? when I google it I come up with different kinds of ounce, I am from Germany originally and we use the metric system. Your recipe though sounds very interesting and I really want to try it out but am so unsure about the weight measurements. would appreciate any advice. thanks in advance………
Hey Sandra. Thank you for this question! I take it for granted that most recipes I come across use non-metric measurements, despite the majority of the world using the metric system. I think from now on I’ll be paying more attention to the units I choose to display for my baking recipes and try to incorporate metric when I can.
As for your question, one stick of butter is equal to 113 grams. For this recipe, I don’t think you’d have any trouble just halving one of the bars you’re accustomed to buying butter in, which would leave you with 125 grams. I don’t think that would change the recipe enough to be a problem. As for the shortening, 12 oz. comes to 340 grams. Hope that helps, I’ll update the recipe on the blog to include those measurements!
thanks so much for taking the time answering. will definitely try this out soon, testing it on cupcakes first and then i want to make a birthday cake for my twin girls.
I have done it and the cake turned out sooooooooooooooo well……will be using this recipe for making buttercream……..THANKS a lot for the conversion. Will tag a photo of this cake on FB……thanks sooooo much…..
Awesome! I love that cake, it comes out right every time and it’s very sturdy without being too dense. So glad this worked for you!
Hi Alayna!
So thankful I found your site! Melting buttercream frosting is my biggest problem since I’m living here in the Philippines and it’s everyday SUMMER! I havent tried shortening in my frosting, usually I used boiled icing and ganache… Will try making this recipe today.. One thing, is it okay if I color the frosting with gel paste(purple)?
Tks a bunch!!!
You could definitely color it with a gel! I’d leave out the splash of milk from the frosting though since the gel paste will probably add some moisture of its own.
I didn’t have the stuff to make my regular BC do I googled for recipes to use what I had, didn’t have time to go to the store!
Used this one and loved it! Made a lot and tasted good too!!
So glad this recipe worked for you! It’s my go-to frosting since it comes together so fast.
Quick and very creamy! Not too sweet either which I love!!
I love this buttercream recipe. I was wondering though if I can somehow make it into a chocolate buttercream? Can I just add the Nestle cocoa powder to it or would that just ruin the recipe all together? What would you recommend to do?
Thanks!
I’ve never actually tried making a chocolate version of this recipe, but I would think that simply substituting some of the powdered sugar with cocoa powder (maybe 1/2 or 3/4 cup?) and replacing the vanilla extract with a good quality chocolate extract would do the trick. I’d love to hear how this turns out if you try it!
Well looks like I get to do a little experiment, which will be fun. I’ll make a small batch later tonight to see how it turns out. I think I will try 3/4 cup of the cocoa powder and use about a teaspoon of almond extract since I don’t have a chocolate one. I’ll let you know how it turns out.
So I gave the chocolate version a try and it worked out great! It has more of a fudge taste to it, but still really good and not too sweet. I mixed the 2lbs of powdered sugar (minus 3/4 cup of it) with 3/4 cup of nestle cocoa powder and then followed the directions for your original recipe. I did end up using 3 tablespoons of milk since it was a bit more thick than the other. Next time I am going to use cream to see how it works out, but the milk works just fine. Thank you again for your help.
I am thrilled to hear that this works. I may even add a note to the recipe post offering this method as an option to others. I’m trying to think of an excuse to try it myself soon now!
Your recipe is great! I am using it for a friends wedding cake next week. I was wondering how many batches I would need to make 1 12″ round? I have made it in a 9″ but not in a 12″ yet and I see that you used this recipe for a wedding cake as well. Any advice you could give would be greatly appreciated.
Glad you like the recipe! I must confess, I still haven’t quite learned just how much of it I need to make different-sized cakes with. The recipe in the post covers a 9 inch cake, so I’d imagine you’d need 1 and a half to 2 batches for a 12-incher. I’d make 2 to be safe, and if there’s any left over you can spread the rest on a blueberry muffin and have a cupcake for breakfast when no one’s looking!
I need to know if this crusted buttercream icing will work well with royal icing snowflake toppers for cupcakes?
How much of each ingredient do i need if i half the recipe?
2 sticks (226 grams) room temperature unsalted butter
12 oz. (340 grams) unflavored vegetable shortening
1/2 tsp. salt
2 tsp. vanilla extract
2 tbsp. milk or cream
2 lbs. (32oz., 907 grams) powdered confectioner’s sugar
HALF…
1 stick (113 grams) room temperature unsalted butter
6 oz. (170 grams) unflavored vegetable shortening
1/4 tsp. salt
1 tsp. vanilla extract
1 tbsp. milk or cream
1 lbs. (16oz., 453.5 grams) powdered confectioner’s sugar
I love this recipe! I use it everytime someone requests BC! My next cake will have to be strawberry buttercream or this with strawberries in it. Have you added strawberries before? If so, did you skip adding as much milk?
Awesome! It’s my go-to buttercream as well. I haven’t tried a strawberry version yet, but you’re right on that you’ll need to reduce the moisture content. I’d eliminate the milk entirely, you may even want to cut back on some of the butter or shortening too. I couldn’t even guess how much though. I’d love to know what you did if you find a formula that works for you. Good luck!
I used this same recipe and eliminated the milk entirely bc I used frozen strawberries and puréed them..added them at the end of everything and everyone loved it! We had another cake there from Edgar’s bakery and no one liked that cake bc of the icing being too sweet and mine was gone within 30 min of singing happy birthday thanks again for the recipe!
This makes me so happy! I’ll definitely try it with strawberries now.
Thanks for this great recipe and guidance. I included yours in my test of 9 different buttercreams side by side — 5 scratch-made and 4 store bought. This one was easily the crowd favorite in taste, texture and was my favorite in decorate-ability. You were right, the recipe holds its shape under demanding circumstances. I will be using this recipe for my daughter’s 2nd birthday next month, really appreciate that you shared it!
Hi I am getting ready to do a wedding cake in two weeks and I am still looking for a strawberry frosting recipe. The weather where I live is in the 90’s. I will bake on Wednesday and on Thursday filling and covering the cake and Friday I need to do damask piping sat deliver cake. Need help for a great strawberry buttercream icing that will hold up to 90 degrees
I am very interested in using your buttercream recipe. Can you tell me how it tastes? I really don’t like the greasy feeling that some buttercreams made with shortening leave in your mouth. I need a recipe that will hold up to the Arizona sun and not taste awful.
Hi Judi. Glad you liked the recipe. I agree that buttercreams with too much shortening just don’t taste as good. You can definitely still taste the butter in this one, and it is sweet but not grossly over-sweet. There’s no greasy mouthfeel but it can be difficult to wash off of hands and utensils, you’re gonna have that problem with any amount of shortening present though. It’s a difficult balance, the shortening really does keep the frosting from melting but the butter is necessary for flavor. I think you’ll like the balance in this one.
Will condensed milk help with crusting?
I’ve never tried this, but any liquid will most likely do the opposite. Lots of fine powdered sugar is what makes a good crust.
Hey, I am researching recipes for the buttercream filling of a tiered cake Victoria sponge wedding cake and need to make something that isn’t going to melt or soften too much … Is it okay for this? It will be a 3 tiered cake with double layers with buttercream and raspberry jam …. It is going to be displayed for a few hours and want to make sure it keeps okay. Is it best to put the jam on top above the buttercream? Does it taste the same as buttercream? Thanks
I had the cake in this post out in 80+ degree weather for several hours under a covered porch, and while it did start to get shiny, none of the buttercream started to run or slip. I put jam on top of the buttercream for this cake and it worked fine, just be gentle when layering so it doesn’t all squish out the sides. It’s not as buttery as an all-butter buttercream of course, but there’s definitely a strong butter flavor and none of the fake plastic taste of an all-shortening frosting either. This is my go-to frosting for a cake that will need to withstand heat of any kind.
Hi Alayna
I’m fairly new to the cake decorating world,I was searching for a non melting buttercream! I had a major mishap with my buttercream melting at an indoor event that got wayyy too hot an the A/C refused to work! Now that the weather is hot I’m petrified to do any cakes! The last cake I did using this recipe, after frosting it was crusted quite a bit so I spritzed it slightly with water to adhere fondant but it did absolutely nothing. I kept getting all these air bubbles under my fondant now I have an outdoor event tomorrow and so far 2 of the 3 layers have bubbles under the fondant also. I’m about to cover the last layer and hoping third time’s a charm. I have never had this issue with strictly butter buttercream! Any tips you can provide?? Thanks
Hey Sara. I’m sorry to hear you’re having this issue. I’ve had problems with bubbling before too and the thing that solved it for me was to skip the spritzing. Adding moisture does help fondant to stick, but it also can cause it to move around too much. Especially if you’re anticipating heat, I would skip any steps that add more moisture. I’d even go so far as to say, unless your buttercream is crusty enough to almost feel sharp around the edges, you might even try dusting it with some powdered sugar and tapping off the excess before adding your fondant. I have not tried this personally, but that’s what I would try next if I were experiencing the same thing. If you do this, you might have to be extra careful with that cake layer since the fondant won’t be completely adhered, but once it’s sat in the warm venue for a while the buttercream will have melted just enough to stick the fondant on for good. I hope this helps you!
Hi I was wondering is this recipe good for just covering w i th fondant cakes or is it good for piping and decorating all buttercream cakes?
Hi Christina. I have used this buttercream for a fondant-less cake with piping details and it worked wonderfully. One tip though: Make sure it stays cool! The warmth from my hand started melting the buttercream causing it to look a little yellow and I didn’t notice until I was half-way done with the cake. To avoid this, have two piping bags filled and ready to go. Keep one in the fridge and trade it out as soon as the one you’re using starts to feel too soft, and keep switching between them to make sure you’re always using a cool batch.
Thanks I only do cakes as a hobby, like my kids cakes. Have you colored this buttercream I’ve had problem with the heat making it look sweaty with blotches of color like little small dots of color. I live in central Florida so it really hot and I’m doing my daughter’s cake in a few weeks so I’m hoping the shortening will help with that thanks
I haven’t ever colored this frosting, but if you do, I’d omit the splash of milk the recipe calls for.
I have tried many different buttercreams in an attempt to find one that holds up well and tastes good.the search is over, though. I LOVE this buttercream. It makes perfect edges, holds up well, and tastes great. Thanks so much for sharing!
Yay! That makes me so happy!
I tried this today as a dry run for making my brother’s wedding cake in August – it’s fantastic!!! Thanks!
I left one cupcake out in the sun to see how it held up and 2 hours later and it’s absolutely fine!
Awesome! I love your cupcake test, that’s brilliant!
I was wondering if the frosting is able to be frozen? I have extra, but don’t want to waste it
Yes! I’ve frozen it for many many months and it came out the same as the day I made it.
Oh and it’s delicious!!
Hi, we are thinking about using this frosting for a wedding cake. We are planning on making the cake on site and it won’t have access to a refrigerator. Can this frosting be left out for 24 hours or so?
Hi Kaitlin. I’ve found that leaving this frosting out for long periods can make it start to turn yellow from the butter re-melting. It’s also gonna get glossy and not spread correctly on the cake. It’s fine when it’s already on the cake, but it’s hard to work with if you’re applying it when it’s already melty. If you have no access to refrigeration, your best bet is to go all shortening (no butter) and pack even more powdered sugar into it. I’d then replace the vanilla extract with a butter flavoring to help cut into some of the extra sweetness. Hope that helps, there really is no ideal solution for frosting without refrigeration for that long.
Hi, I was wondering how much frosting (batches of the above recipe) I would need to make a 9″ rosette cake? I’m so confused about how much I would need because the rosette design needs more frosting.
Please HELP!
I was wondering how long this frosting will stay good for in fridge? I Tested the recipe out already and it’s great for my fondant covered cake I will be making. I have so much to do, I am trying to get as much done as possible ahead of time. I don’t want to jeopardize taste though. Will it be just as good if I make it 3 days ahead of cake’s due date? Thanks for the awesome recipe!
3 days ahead should be just fine, I’ve left it for several weeks without a problem. Glad you love it!
Do we need to add the shortening or could we just use the butter:)
Kate recently posted..Healthy breakfast popsicles: 2 ways
Hi I really love the flavor of your cake recipe and want to use it for my next cake order. I baked it for my family to try and unfortunately the next day the cake was dry and crumbling even though i crumb frosted. I’m in AZ are there any pointers?
hi! i was thinking of using this recipe to put fondant over, would it affect the fondant in any way after removing it from the fridge (and putting the fondant after)?
Cheryl A recently posted..duxsy:
|blogger here|
Not at all, that’s usually how I do it. Just give the cake 20 minutes or so out of the fridge before covering and you should be fine.
Id like to know if you know the reason to this….. When the icing starts to crust and move the board, it d start to crack. Why does it crack?
Hi Alayna – A friend of mine is asking me to make her wedding cake and I am looking forward to trying your butter cream recipe as it is in June! I am planning on doing a salted caramel butter cream do you think this will still hold up well if I add caramel and sea salt to your recipes as is?
Thanks!!
Hi Lynne. I’ve never tried what you’re describing, but my honest opinion is that simply adding caramel and salt to this recipe will make it much softer and no longer crust. I’d look for an existing salted caramel buttercream elsewhere from someone who’s had the time to test it out and make sure it works, any advice I give you to alter my own would be a complete guess and I’d hate to ruin your friend’s wedding cake with my incorrect guesses. Sorry I couldn’t help much, but I hope you find the perfect frosting for your cake!
I make a lot of cakes for birthday parties but was asked the other day if I would do a small cake and cupcakes for 300 people, I was wondering if this frosting would be good for piping rosette swirls and them keeping their shape in the heat in the middle of July? If I make the frosting ahead of time and store in the fridge does it need to be whipped again before using? Thank you so much for sharing your recipes and ideas.
Sorry to reply to you so late Deborah, I hope this information is still helpful to you. I haven’t piped rosettes with this frosting but it held tiny pin dots very well on a hot day. I think this would work for that application just fine. And no, there’s no need to re-whip, but a good stir will help break up anything that crusted in the fridge.
HI I want to try your BC recipe. I just want to know if i still need to put back the covered cake with fondant in the refrigerator with this kind of buttercream? i want to make the cake 1 day before the event.thank you.
Hi Tina. You can refrigerate the cake with the fondant applied, but be wary that the longer it stays in the fridge the more the fondant will dry out, which could result in cracking and general fragility issues. Keep your fridge at the warmest setting you feel comfortable with and you could even lightly wrap the whole thing in plastic wrap to help avoid too much drying. If you choose to leave it out, the ingredients are stable enough to not cause a health issue, but a too warm room could cause some sagging. Ideal is to leave it out in an air-conditioned room below 70F. Hope that helps!
Could you tell me how many cups of shortening and powdered sugar instead of ounces?
I would like to know this answer too!
Hi- I’m so excited to try this recipe with all the great feedback! I was wondering if you would change the temperature or the cooking time if I am using 8 inch round cake pans? Thanks!
Leave the temp the same, but it may take a few more minutes to cook through since the cake will be deeper. I’d test it with a toothpick at the normal time and add 5 minutes if it’s not quite there. Hope that helps!
Pingback: Minions! | Experiences Of Life
Hi. I was just wondering if you know how many cups this recipes takes. I’m trying to figure out if I use the regular food coloring (lime green =10 drops of green to 1 cup of frosting) how many batches I will need or drops. Thanks so much!
Hey Gina. I honestly don’t know exactly how many cups this makes, but my guess would be around 6. I left a comment on someone else’s question that for gel or liquid food colorings you can just omit the milk from the recipe and then add color to your liking. With a powdered coloring you can leave the milk in, and again just add to your liking. Hope that’s what you needed!
Can this be colored without messing up the frosting?
Yes it can! For liquid or gel colorings, omit the milk from the recipe. With powdered colorings, leave the recipe as is.
I live in NC and bake cakes as well. That shortening in the frosting saves the day! Can’t live without it. At our house we call the frosting filled muffin tops “cake sandwiches”. Wouldn’t ever want to bake a flat cake! Love tasting and knowing it is perfect!
Thanks everyone for all of the questions as they have answered many of mine. Most of all, thank you to Alana for the recipe.
Can’t wait to try your buttercream icing. Thanks for sharing
could you use a butter essence flavouring to make it taste more buttery?
Absolutely! Add it in addition to the vanilla rather than instead of, works great!
Hi! Quick question…I have to make enough of this for 100+ cupcakes. How many batches will I have to make?
This recipe looks amazing and so simple!
Thanks! xx
Hey Lauren,
I hope this isn’t too late, but I’m sorry that I don’t have a great answer for you anyway. I honestly don’t know how many cupcakes can be frosted with a single batch, but I think 25 is pretty typical. I personally would make 4 batches to start with. It’s a quick to make recipe so you can always make a little more if you need, and it freezes well so you don’t have to be worried about making too much.
Hi Alayna,
Nice recipe and I can’t wait to try it for my son’s birthday coming up next week. The reason I’m drawn to it is because we are hosting his party outdoors in northern ca and it’s been warm so I want something that won’t melt or run off the cake.
My son is allergic to dairy so I’ll replace the butter with earth balance dairy free buttery spread. Any experience with that? I also wanted to ask if this is good just for frosting the cake or can I use this for piping as well. I’ll just be doing some basic borders.
Thanks,
Rupeet
Hey Rupeet,
Sorry I’m only now responding, I hope you get this reply in time for your son’s birthday. I have used Earth Balance for a frosting before, and while it will taste great and have a similar consistency to a frosting with butter, it will melt at a lower temperature than butter does due to it’s high moisture content. This is probably still ok if the weather won’t get warmer than the 70’s (F) but any hotter than that and I’m not sure what kind of melting you’d see. As for piping, it’s a great consistency for that. I’ve found that my recipe, due to the butter, has a tendency to turn a little yellow after it’s been warmed up a bit in your hand from holding a piping bag, but maybe you won’t experience that with the Earth Balance. Hope that helps!