Skip to Content

tag

Tag Archives: rice

post

Quick vegetable fried rice

This was so yummy and so easy that we had it two nights in a row!

I started by making 2 cups of rice and set it to keep warm.

I got all my ingredients ready to go. You need:

  • sesame oil
  • soy sauce
  • rice vinegar
  • frozen vegetables of your choosing
  • 2 or more eggs, beaten

I used a wok but you can do this in a large flat pan too. Just add some sesame oil and vegetables to the pan and get it hot, medium-high heat should do it. I used half a bag of “Japanese Mix” which included broccoli, mushrooms, red bell pepper, and some kind of string bean. I actually added about a half of a fresh red bell pepper in too because this mix was really skimpy on it, but you don’t have to add anything.

Wait until the vegetables have thawed and are starting to sizzle before adding the rice, you may want to add a bit more oil too.

Toss everything every 30 seconds or so for several minutes or until the rice is smelling slightly toasty and you can see either sear marks on the vegetables, slight browning on the rice, or both.

Pour over about 3 tbsp. of rice vinegar and toss.  Swirl over a generous amount of soy sauce (probably almost a 1/4 cup) and toss until distributed. Now it’s starting to look like fried rice!

Turn the heat down to medium and wait a minute for the pan to cool down. Make a well in the center of the pan and pour in the beaten eggs.

Stir the eggs as they start to scramble. Use cutting and folding motions to break apart the egg and distribute it throughout the rice. When it’s cooked through, serve it up!

We topped ours with noritamago furikake (seaweed and dried egg seasoning) and super-hot sriracha. It really doesn’t need anything though.

This dish comes together in less than 20 minutes and doesn’t make a bunch of dirty dishes. It’s so much lighter than the stuff you get in a take-out box or thrown at you in a hibachi restaurant, as you can control the amount of oil and soy sauce.

This fresh-tasting and filling dish has quickly become one of my go-to meals when I don’t have a lot of time to make something. You could absolutely chop fresh vegetables and even saute a little onion in too, but the real magic here is that this dish allows you to get something healthy and filling in you without all the work, and I’m going to keep taking the shortcut because it makes my life easier.

And we have enough left over to have it again for lunch, yay!

Quick vegetable fried rice

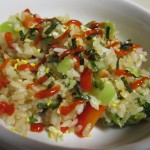
Simple customizable fried rice recipe, never greasy because you control the oil content.

Prep Time: 5 minutes

Cook Time: 10 minutes

Total Time: 15 minutes

Yield: 2 to 4 servings

Ingredients

  • 2 cups cooked shortgrain rice
  • half a bag of frozen vegetable mix of choice
  • 2-3 eggs
  • 2-3 tbsp. rice vinegar
  • up to a 1/4 cup soy sauce
  • sesame oil for frying

Cooking Directions

  1. Saute frozen vegetables in a hot wok with sesame oil until starting to brown.
  2. Add cooked rice to the center and allow to toast slightly, then mix in.
  3. Add rice vinegar and soy sauce, mix evenly.
  4. Push rice to the outside of the pan and fry the eggs in the center, scramble as they set and mix to incorporate.
  5. Serve topped with sliced scallions, toasted sesame seeds, seaweed flake, or sriracha if desired.

post

How to season a donabe

We all know Christmas is about more than gifts, so lets just skip that whole conversation and get right to talking about just how excited I was to receive one particular gift this year……my very own clay pot!

Avid readers will remember that I’ve been pining for one of these for a long, long time and have resorted to using all manner of western bakeware in its’ stead.

No more shall I simmer soup in a brownie pan!  Now, the donabe makes it’s debut!

It was gifted to me by Jeffs’ parents, Mike and Nancy. I cannot believe how well they did at picking out this adorable little pot! The maple leaf design is a specifically Kyoto design, which makes me even happier. Seriously, there was a moment after unwrapping it where I thought I might cry.

“Donabe” is a contraction of the words “do” meaning clay or earthen, and “nabe” meaning pot. (Thank you to commenter Naoko for this translation, as I thought that it was a combination of “don” meaning bowl and “nabe” meaning soup made in a clay pot.) I was really excited to make a nabe for Jeff and I for lunch yesterday so I looked up how to cook with one online only to discover that it has to be seasoned before you can cook with it! Apparently, the donabe is very porous and covered in tiny hairline cracks that need to be properly sealed or else you risk damaging the pot when it hits high heat.

(Based on instructions I found on KyotoFoodie) Here’s what to do: First, make sushi rice!

I made a cup of rice and added about 3/4 of it to the empty donabe along with enough water to fill it about 80% full. Typically then you would cook it for about an hour over a gas stove eye, however we have an electric stove which is not good for a donabe. It gets too hot and the heat is uneven, it could shatter while cooking.

Instead I put the pot in the oven with a baking tray on the rack below it to catch any boil-over. I started heating it to 200 degrees and just kept upping the heat every 20 minutes or so just so that it wouldn’t get too hot too fast and break. Once I got it up to 425 degrees, I let it cook for about an hour. When it comes out, you have a thick gluey rice porridge!

Now, if I had made this with stock instead of water, I’d have what is called okayu, the Japanese equivalent of chicken soup. It’s commonly eaten for breakfast all over the asian continent and goes by many names: okayu, jook, congee, byohk, bubur, juk, and many more. So good with an egg cracked over the top and stirred in!

Anyway, this was not the delicious okayu, this was basically glue. I spooned it up over the rim to seal the edges while they were still warm.

I let it sit like that for about 20 minutes until the donabe was cool enough to pick up. Then I just rinsed it out thoroughly and dried it well. It’s important to make sure the donabe is absolutely 100% dry on the outside, especially the unglazed bottom, before using or it may break when exposed to high heat. For this reason it’s best to hand dry it and then let it air out upside down for several hours.

I can’t wait to use this little guy! I also got a book full of amazing traditional hot pot meals to learn from.

I wanna make everything in there!

Jeff and I are taking a trip to an asian market today to load up on some items that are hard to find in other stores. Wait til you see what I cook up with my new donabe!

post

How to make Sushi Rice

As promised, here’s a little tutorial on how to make sticky sushi rice like a pro at home!

I buy my sushi rice from the farmer’s market in bulk but I’ve seen it in grocery stores too. This whole bag is a little over a buck!

Sushi rice is different from regular rice in that it’s a short grain, (you can see it’s kind of rounder and fatter) and it’s more glutinous than regular rice, which makes it sticky when cooked.

For two people, 3/4 cup of uncooked rice should be enough.  If you’re super hungry, make a full cup. The rice to water ratio is 1 to 1, easy to remember.

Before you cook it you need to rinse it. Just run some cool water over it until the water that drains out is mostly clear, not cloudy.  This takes out some of the starch so that it doesn’t just form a gluey porridge when cooked.

Put both the water and the rice in a pot that has enough room for it to expand some and steam.  Now here’s where the important stuff starts.  Turn the temperature up to high and wait for it to boil uncovered.  As soon as it boils, turn the heat all the way down to the very lowest setting and put the lid on.  Set a timer for 15 minutes and get ready to make the seasoning.

Sushi seasoning is basically a mixture of salty, sour, and sweet flavors.  There are many recipes, but the one we use is this: A three-finger pinch of salt, 1 tbsp mirin, and 1 tbsp rice vinegar. Mix it together and set aside.

When the timer goes off for your rice, remove the pot from the eye and set another timer for 10 minutes.  Do not open the lid at any time!

When that timer goes off, dump your rice into some sort of plate or dish with high sides. We use a baking dish for this.  Try not to mess with the rice too much from here on out. You want to “cut it” with a spatula and fold it, but don’t stir or press.  Be gentle! Fan it like crazy, fold again, fan like crazy some more.

Pour your seasoning slowly over the back of your spatula and lightly fan the spatula to spread the seasoning around.  Fold and fan like crazy one or two more times.

What you’ll have is a pleasantly sweet and slightly sour rice that sticks together, making it simple to pick up with chopsticks.

It may seem like a lot of work, but really most of the process is spent waiting on the rice to cook.  There’s plenty of time left over to create something to go with it. Top it with a stir-fry or roasted vegetables, maybe some simmered squash and tofu, and you’ve just made a donburi!

Sushi rice

How to make sushi rice on the stovetop.

Prep Time: 10 minutes

Cook Time: 25 minutes

Total Time: 35 minutes

Yield: 1 and 1/2 cups cooked

Ingredients

  • 3/4 cup short grain sushi rice
  • 3/4 cup water
  • 1 tbsp. mirin
  • 1 tbsp. rice vinegar
  • a 3 finger pinch of salt

Cooking Directions

  1. Rinse rice until water runs clear.
  2. Put rice and water in a pot and allow to come to a boil uncovered.
  3. As soon as it boils, cover and turn the heat down to low.
  4. Cook on low for 15 minutes then turn the heat off and allow to sit covered for another 10.
  5. Mix together mirin, rice vinegar, and salt in a small bowl to make the seasoning.
  6. Pour rice into a dish, fold and fan it to cool.
  7. Pour over seasoning and continue fanning until cooled.

Hope this was helpful. Maybe someday I’ll finally get a rice cooker and I can have it do all the work for me!