Skip to Content

category

Category: Discussion

post

Not so fond of fondant

I LOVE baking, I LIKE crumb coating and frosting, but I HATE working with fondant. This stuff is so finicky and delicate and heavy and sticky. One wrong move and you’ve ruined it, and this stuff ain’t cheap. There really is no room for error.

My trials with fondant began early in the week when I decided to go ahead and dye a piece that I would later be using to make striped trim around the cake. I needed to get this small chunk of fondant to a deep navy blue, and after an entire bottle of navy gel dye and a half hour of kneading and squeezing, I still had only this…

dying navy fondant

That’s decidedly not navy. It was obvious that I was gonna need a LOT more dye to reach the deep color I was looking for, so I knew I’d need to schedule time during the week to make another trip to the cake supply store for more dye.

BTW, if you’re in the Atlanta area and are in need of professional cake decorating supplies, I cannot recommend Cake Art enough. I could not believe there was an entire store dedicated to cake decorating that was only a few miles from my house. Their staff is extremely helpful and I would have been in serious trouble if I ever found myself in need of more supplies that I could only find online. They even have classes!

Anyway, since I couldn’t finish that project that day, I moved on to creating a bow ornament out of fondant. I can never find my preferred brand of fondant; Satin Ice, in small quantities, so I purchased this Pettinice brand instead in a 1.5 pound size. The thing about Pettinice is that it’s a lot stickier and bendier. I needed to firm it up a bit so that it would hold it’s shape well for making the bow, so I added corn starch in small batches until it felt like the right consistency.

Kneading fondant for bow pieces

I rolled a small piece of it out on a SilPat (non-stick silicone mat) and used an exacto knife to cut out the shapes for each part of the bow. I then made some pleats in the tails and stuffed the loops with some saran wrap so they wouldn’t flatten out as they dried.

I set them on their own little board and let them set up in the fridge.

bow pieces for wedding cake

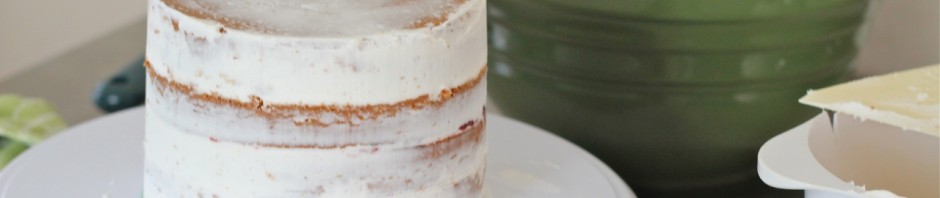
Now here’s the real fun part – covering the cakes with the fondant.

You want to first measure your cake to see how large you need to roll out the fondant. You measure across the diameter and up the sides, then add a few inches to make sure you have enough to work with. My biggest cake layer needed a circle of fondant nearly a yard across! It barely even fit on the table.

Rolling fondant with cornstarch

The professionals use a kind of giant pasta roller machine to make fondant sheets of a perfectly even thickness, I used my biggest heaviest rolling pin and went to town. I had to use a lot of cornstarch to keep the fondant from sticking to the table or to the rolling pin. You constantly need to be running your hand underneath the sheet to make sure it’s not sticking anywhere, and add more cornstarch if it is.

Rolling out fondantRolling fondant wider

If you find any air bubbles you can pop them with a pin then roll over them a few times to squeeze the air out and smooth out the scar. Keep rotating the fondant to make a nice circular sheet. Use a yard stick to see if it’s big enough. If it’s not big enough and you’ve already got it rolled paper thin, you might have to wad it up and knead in more fondant, then start over. It’s a pain, and I got lucky this time that I had enough to work with for each layer. I still don’t know how many pounds of fondant are needed to cover different sizes of cake.

Rotating fondant

Here’s the part that absolutely kills my nerves. First, there’s getting it onto the cake without stretching or tearing it. My favorite way to do this is to put both of my arms underneath it with my palms facing up, and then lift it straight up and place it straight down on the cake. Professionals usually roll it around a rolling pin and then unfurl it across the cake. I don’t do this because I’m clumsy and because rolling the fondant when you’ve worked a lot of cornstarch into it can cause a wrinkly surface texture known as “elephant skin.” I’m looking into getting a huge silicone mat to roll out fondant on so that I won’t have to use cornstarch anymore. That’ll take care of the elephant skin problem for good.

Smoothing fondant over cake

Once you get it on the cake, you need to work quickly to smooth the fondant over it seamlessly before it starts to dry out and become less pliable. This is definitely a skill that needs to be practiced to be mastered, and I am nowhere near mastering it. You can start by smoothing it across the top, then the technique is to lift the curtain of fondant up and, starting towards the bottom of the cake, you smooth it upwards with your hand. You have to keep lifting and smoothing until it’s all tucked in. Really difficult because there’s more material hanging over the edge of the cake than there is surface to smooth it onto.

Fondant almost stretched over

That’s it almost finished, just a few more wrinkles to lift and smooth. At this point you should use a smoothing tool to get the angles really crisp. It’s basically a flat piece of plastic with a handle that you run all over the cake with light pressure. You then run it up and down the sides to make a sharp edge at the bottom. Then you can cut the excess fondant off with a pizza cutter. I always leave about and inch extra though because fondant can tend to shrink up a bit in the fridge. So once I’m sure it won’t shrink anymore I go back with an exacto knife and cut it right at the edge.

The last thing I had to do before decorating was to add the support rods. Cake is heavy. I buy these plastic dowels and then cut them to size.

Cutting support rods

You want them to come right to the top of the fondant. Any higher and you’ll see a gap between the tiers, lower and the tier above will squish the one below. It takes a lot of adjusting to get each dowel the exact height it needs to be. You can see below that the dowel on the right needs to lose about a millimeter off the top. You wriggle it out, wipe it off, and carefully trim the edge with scissors. I finished this up around 11pm.

Inserting support rods

All that’s left to do is to decorate it and transport it to the wedding site!

Little did I know just how crazy my last morning of work on the cake would be…

post

Crusting no-melt buttercream of my dreams and my favorite vanilla cake

If you’d like to follow along with the whole process: Check out how I made the strawberry jam filling, watch me work with fondant, add the finishing touches, and see the finished cake!

So that was the jam, but I also used Monday to whip up 6+ pounds of buttercream frosting. Sounds like a lot, but it’s actually really quick and easy to make, only I had to do it in 3 batches because it wouldn’t all fit in the mixer at one time.

6 lbs. of buttercream

For a 2 lb. batch of vanilla buttercream which can be multiplied easily…

Crusting No-Melt Vanilla Buttercream

Ingredients

  • 2 sticks (226 grams) room temperature unsalted butter
  • 12 oz. (340 grams) unflavored vegetable shortening
  • 1/2 tsp. salt
  • 2 tsp. vanilla extract
  • 2 tbsp. milk or cream
  • 2 lbs. (32oz., 907 grams) powdered confectioner's sugar

Cooking Directions

  1. Beat together butter and shortening until pale and glossy.
  2. Add salt and vanilla and mix in.
  3. Add in powdered sugar a little at a time on low speed, beating on a higher speed between each addition to fully incorporate.
  4. Add milk and mix on low, then beat on high until frosting is pale and fluffy.
  5. Store covered in the refrigerator and allow to come to room temperature again before using.

Now, I normally wouldn’t touch shortening with a ten foot pole for my baking projects, but it is absolutely invaluable for frosting cakes that may be exposed to hot, humid weather for long periods of time. This is; of course, a major concern in Georgia, and sure enough Caitlin’s cake ended up sitting out in the 80+ degree weather for a few hours before it was cut into. The fondant on the outside of the cake suffered a bit, but the buttercream inside refused to melt. Shortening may be unhealthy, greasy, and take away some of the rich butter flavor of an all-butter frosting; but while it may start to get glossy in the heat, it just won’t melt. And you know, the finished frosting tastes really good too, so I’m not going to complain.

Anyway, the next day I got to baking the cake layers so I’d have somewhere to put all that frosting and jam. For the next few days, I only got pictures of baking the biggest tier, and frosting the smallest tier; so though the pictures below happened on different days they’ll still give you the idea of the flow of things.

Dollops of batter in the baking pan

I used the same vanilla cake recipe as last time because it’s really simple to prepare, it makes a sturdy and durable cake, and it has a rich buttery flavor. It’s a little denser than a typical wedding cake, but I personally enjoy the texture. It just tastes and feels more homemade.

Here’s the recipe I use that will fill two 9-inch pans…

My Favorite Vanilla Cake

Ingredients

  • 2 sticks room temp. unsalted butter
  • 2 cups white sugar
  • 4 large room temp. eggs
  • 4 tsp. vanilla extract
  • 3 cups all-purpose flour
  • 3 and 1/2 tsp. baking powder
  • 1 cup room temp. milk

Cooking Directions

  1. Butter and flour two 9-inch baking pans and set aside.
  2. Cream together butter and sugar until pale and fluffy.
  3. Add vanilla, then eggs one at a time, mixing between each addition.
  4. Sift together flour and baking powder and add to batter in 3 additions, mixing between each.
  5. Slowly pour in milk while batter mixes on lowest speed, then beat on medium-high for several seconds to fully incorporate.
  6. Pour into baking pans and spread evenly with a spatula. Bang bottom of pans on a hard suface a few times to bring any air bubbles to the top of the batter.
  7. Bake in a pre-heated 350 degree oven for 40 minutes.
  8. Allow to cool in baking pans until pans cool enough to handle, then turn out onto cooling racks and allow to come to room temperature before use.

This recipe can also be halved, which comes in handy for the smaller tiers of cake which use one and a half batches to fill two 6-inch pans.

So after the cakes are completely cool, they get a haircut. The puffy muffin tops get sliced off and the brown crust is removed from the undersides of any layers that face the center of the cake.

Trimming the muffin top from the bottom layer

My favorite way to do this is to use a small pairing knife first to make an incision all the way around the cake, then I take a longer knife and sweep towards the middle from all sides until the muffin top slides right off. At this point you should break off a slice of muffin top and slather it with frosting so you can “test it for deliciousness.”

As you can see above, the bottom layer is on a round of cardboard for ease of moving it around and for added stability.

Slicing cake layers in half

For the smallest tier of cake, I was able to just bake two really tall layers and slice them each in half for 4 total. I wouldn’t try this trick with the bigger layers though, they’d be too heavy and flimsy and just break apart. It’s hard enough to move them around without breaking as it is.

Time to frost! I decided to get all fancy and purchase a cake decorating turntable this time around. Best $20 I could have spent. It made frosting so much easier and I’ll definitely still get use out of it for other baking projects throughout the year.

Layer 1 plus frosting

Layering with more frosting, a big dollop of jam, and piled high with yet more frosting to start the crumb coat…

Layer 2 plus jamFull top tier getting crumbcoated

The crumb coat is a thin layer of frosting that helps to seal in the moisture and crumbs. It keeps your cake fresh and spotless. You basically just glob on frosting all over, then use either an offset spatula or scraper tool to scrape it all back off. This is also when you want to pay attention to how your cake layers are lined up; once you put it into the fridge for the buttercream to crust up, there’s really no more moving them around.

Smoothed out crumb coat on top tier

After about about an hour in the fridge for the buttercream to crust (become slightly hard and crispy) I took it back out to frost. It’s the same technique as the crumb coat, only you apply less pressure when removing the excess frosting to leave more behind. At this stage you want to work to get the frosting as smooth as possible. Here mine is crusting up in the fridge. It’ll get one more polish with the scraper once it hardens to remove the last of the imperfections.

Top tier chillin' in the fridge

I also went ahead and made some bases for each layer to sit on out of some foam board from a shipping container and covered them in foil. Right now, this is the best solution I have for transporting my cakes undamaged. We have some plastic angled bracket things that velcro to the fabric material in the back of my car and we use those to corral the cake bases in place. They’re secured to the bases by a bit of double-sided tape. That makes it easy for me to pry them up, but hard for them to slide around.

My wedding cake setup

So that’s it for the frosting. Next time we talk about my mortal enemy – fondant. My eyes are rolling back in my head just thinking about it.

post

Strawberry jammin’

I am so excited to share with you my recent cake baking adventures! As you may know, I made my first wedding cake ever last year for Jeff’s younger brother. It was a long and difficult process and at the time I was sure I’d never want to do another one again. But, I learned so many things last time about how I could have done it better if I had it to do all over, so naturally I began to wish I had another chance to put this new-found knowledge to use.

The engagement of Jeff’s youngest brother; Bryan, to his lovely fiance; Caitlin, gave me just that chance. I offered to do their cake for them and was both excited and nervous when they accepted. Caitlin decided on a sophisticated and classic design that I was sure was in the realm of my abilities, but there was one component to it that I had absolutely no experience with… jam.

cutting strawberries for jam

Sure, I could have just bought jam, but I saw an opportunity to learn a new skill and create something really custom and unique. And so, this cake baking journey begins with $18 worth of strawberries and some seriously good strawberry vanilla jam.

I started the Monday before the wedding (which was on a Saturday.) It took about a half hour or so to chop up the 4 quarts of strawberries I needed for the recipe. I used about 3/4 of the giant flat of berries I purchased, leaving me with a huge gallon bag of them that’s now sitting in my freezer ready to become smoothies. :)

strawberry jam ingredients

I had to learn all about jam-making for this project, and one thing I learned was that a jam needs pectin (a complex sugar naturally occurring in plants that acts as a gelling agent) in order to set up correctly. Strawberries are very low in pectin naturally, so you need to add some to get the right consistency. You can buy pectin in powder form, but for the life of me I couldn’t find the stuff anywhere, so I went with another technique to introduce pectin to the jam: citrus zest.

Citrus fruits; especially their rinds, pith, stems, and seeds, are all high in natural pectin. I wasn’t sure how much of it I needed, so I just used what I had and hoped it worked. Thankfully, the zest of 3 lemons combined with their juice ended up being plenty to get this jam gelled.

macerating strawberries

The next step was to let the berries macerate in the juice and sugar until they became soft and released much of their own juices. I let them sit for about 2 hours while I ran an errand, but I think even one hour would have been plenty. I could not resist to eat a few of the sticky sweet strawberries right out of this bowl. They were incredible!

After that, it’s pretty easy to turn them into jam. I put them in a large pot and let them boil away for close to an hour, making sure to skim off any foam that formed on the top to keep it from boiling over.

boiling strawberry jam

At the very end, I mashed them up a bit with a potato masher to make it a bit smoother (better for putting in a cake so there are no chunks to make the cake layers uneven,) and then added a few tablespoons of vanilla for a sweeter, more rounded flavor. The vanilla took the tart edge off the jam, making it a “strawberries and cream” type flavor.

And here’s how you can tell when it’s done…

I put a small plate in the freezer before I started boiling the jam. You can put a small dollop of jam on the cold plate, count to ten, then tilt the plate to see if the jam is still runny, or if it moves more slowly across the plate. This jam looked ready!

testing strawberry jam

And there it is in my biggest plastic container. I don’t know exactly how much this made, but I know that I only used half of it on the cake. Now I know for next time not to make so much d@mn jam!

finished strawberry jam

Here’s the recipe for the quantity I made. You can easily half or even quarter this for your own use though. It really is excellent, I’ve been putting it on toast and yogurt all week!

Strawberry Vanilla Jam

Ingredients

  • 4 quarts strawberries (chopped small)
  • 3 cups white sugar
  • 8 tbsp. fresh-squeezed lemon juice
  • zest of 3 lemons
  • 3 tbsp. vanilla extract

Cooking Directions

  1. Stir together chopped strawberries, sugar, lemon juice, and zest in a large bowl and leave covered for at least one hour.
  2. Transfer to a heavy-bottomed pot and boil for 40 minutes to an hour, stirring frequently with a spatula and skimming foam from the top continuously to prevent over-boiling.
  3. Mash jam with a potato masher to desired consistency and add vanilla, mix thoroughly.
  4. Test jam on a cold plate for doneness. If it still runs quickly after 10 seconds on the cold plate, reduce it further by boiling for 10 or so minutes longer. If it runs slowly or not at all, it's done.
  5. Jam should stay safe in the refrigerator in a sealed container for at least a week. Freeze or can any remaining.

Next up, making 6 lbs. of buttercream and layering it with the jam between fluffy vanilla cake!

6 lbs. of buttercream

Yes, I used all 6 lbs. of frosting!