Skip to Content

tag

Tag Archives: snacks

post

Strawberry sushi

I’ve been entertaining the idea of this recipe in my head for ages. Long before berry season I dreamed of these little bite-sized treats and couldn’t wait for my favorite fruit to ripen so that I could make these over and over throughout the warmer months. Strawberries have been tasting sweet and ripe for a few weeks now, but for some reason I’ve had a really hard time getting myself to finally make this recipe that I so longed for all winter.

Strawberry Sushi

What it took was a visit from a far-flung friend. Hannah of Wayfaring Chocolate has been staying with me for the Atlanta leg of an epic travel adventure/ global slumber party that she’s about 10 months into now. It has been so much fun to spend time with someone that before only existed in pictures and writing. Blogging is so wonderful in that it has allowed me to create many such friendships with kindred spirits I might never have had the chance to meet in “real life” otherwise. And now that she’s in my house, I must look productive! Cook all the things!

Strawberry Sushi

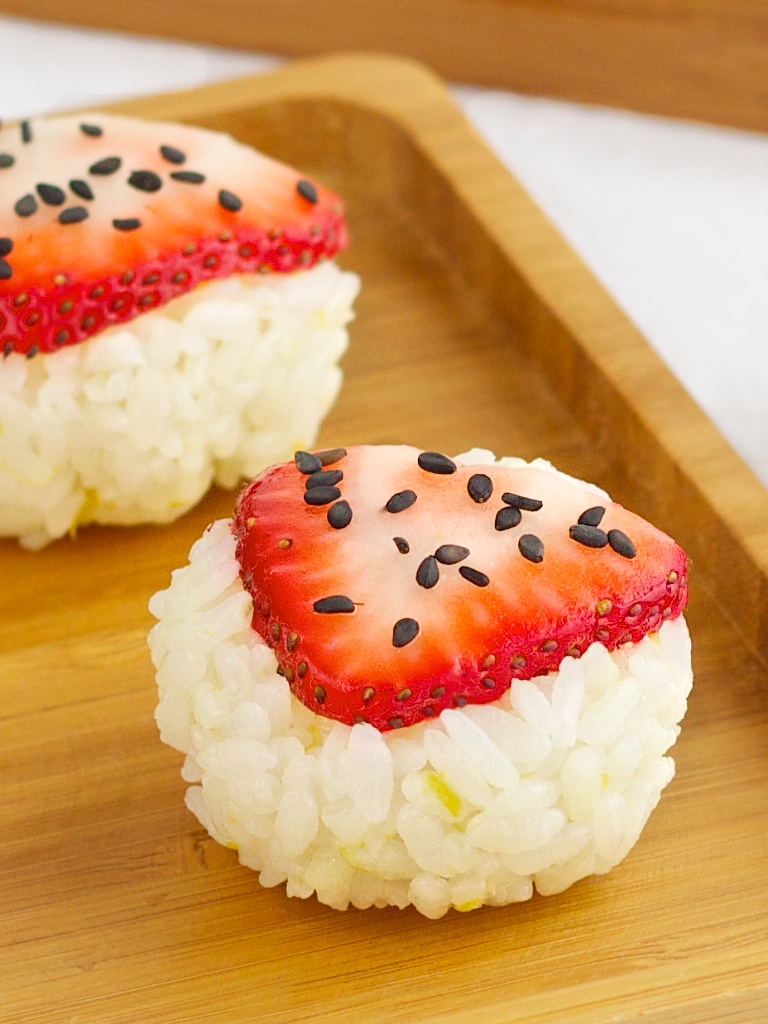
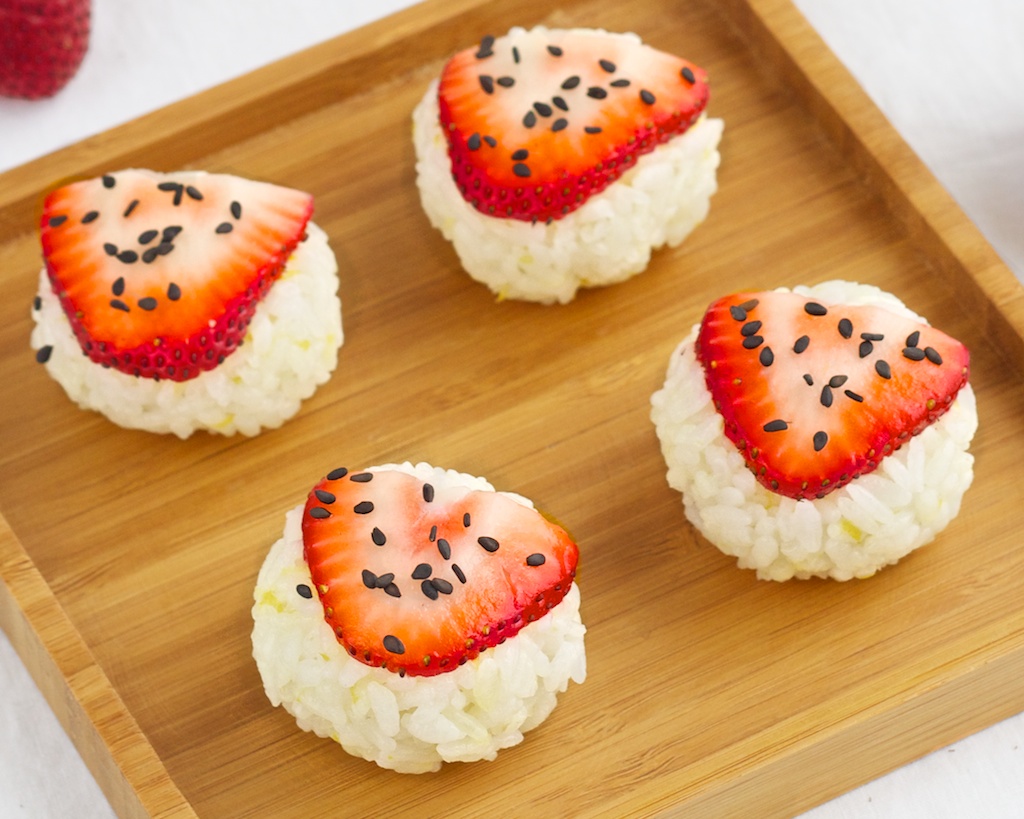
We both enjoyed sampling these sweet little strawberry sushi. The rice is just lightly sweetened with sugar and zinged up with the subtle tartness of fresh lemon juice and zest. The texture of the thinly sliced strawberry on top is strangely but appropriately reminiscent of fresh sushi-grade fish – firm but giving way to softness and a burst of bright flavor.

Strawberry sushi

A simple to make sushi featuring fresh strawberries pressed into balls of lightly sweetened sushi rice.

Prep Time: 15 minutes

Cook Time: 25 minutes

Total Time: 40 minutes

Yield: Makes 12 to 14

Ingredients

  • 1/2 cup short grain rice (sushi rice)
  • the zest of one lemon
  • 1 tsp. lemon juice
  • 1 tsp. sugar
  • 5 or 6 medium-sized strawberries
  • black sesame seeds for garnish if desired

Cooking Directions

  1. Prepare the rice: Rinse rice under cool water until water runs clear. If using a rice cooker, follow the instructions for making one cup of rice using the provided measuring cup.
  2. For stovetop rice: Rinse 1/2 cup of rice and bring to a boil with 3/4 cup of water in a medium sauce pot. As soon as water boils, turn heat down to lowest setting and place the lid on the pot. Allow rice to cook on lowest setting for 10 minutes, then turn off the heat and allow to continue steaming for an additional 10 minutes. Do not remove lid at any time during cooking or steaming.
  3. Transfer rice to a dish and fluff it with a rice paddle or spatula using cutting and folding motions.
  4. Add zest, juice, and sugar and incorporate using the same cutting and folding motions.
  5. Slice strawberries into thin slices. Place a slice in the center of a sheet of plastic wrap and top with a small ball of rice. It helps to dip your hands in water before handling the rice to keep it from sticking as much.
  6. Pull the plastic wrap up around the ball of rice and twist to form a tightly packed ball. Repeat until all the rice is used.
  7. Brush the top of each strawberry with a lemon wedge and sprinkle over sesame seeds to garnish.

These sushi are extremely easy to make. They are made in the temari-zushi style where all the ingredients are compacted into a little ball shape that is meant to resemble an object of Japanese folk art. A temari is a toy ball covered in ornate patterns of colorful thread and sometimes scraps of luxurious kimono fabric. These days, this intricately crafted object is much more art than toy – a collectible piece made by talented artisans while the toy versions are mass produced out of less expensive materials.

Strawberry Sushi

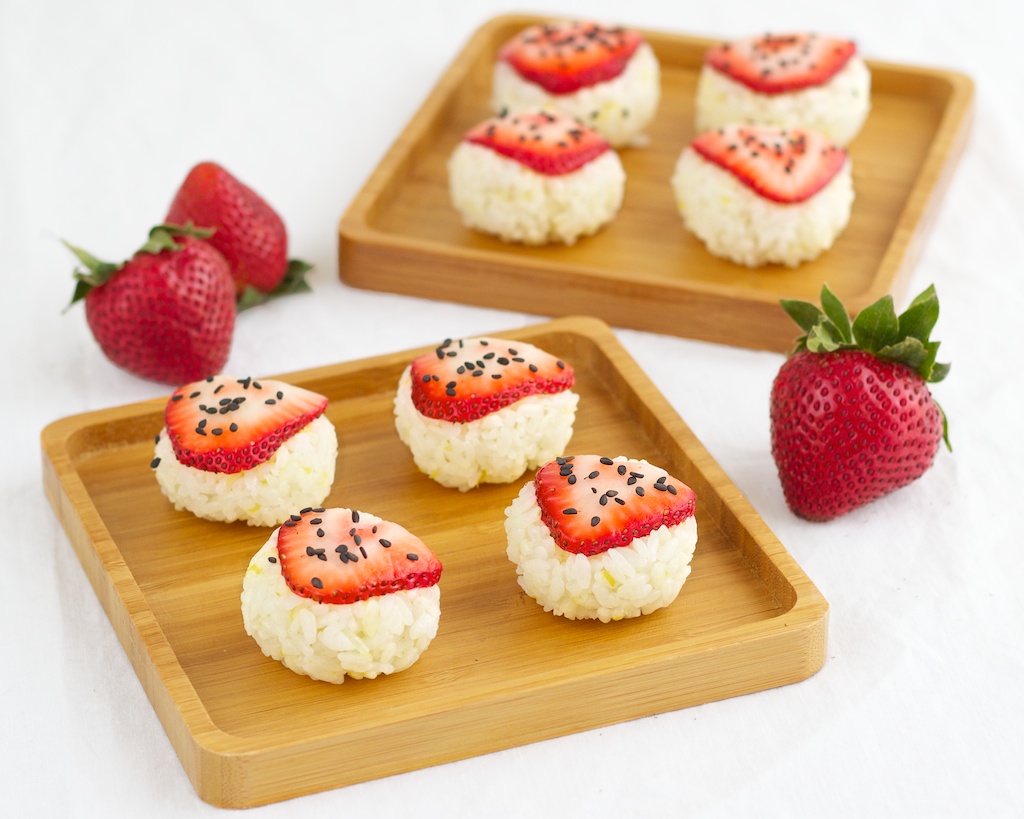
I use the plastic wrap method to make them. Just lay down a square of plastic wrap, place a slice of strawberry (or whatever topping you’re in the mood for) in the center of the plastic, add a small handful of rice, and then twist the plastic wrap up around it to compact the whole thing together. You can use as much or as little rice as you prefer. It helps to keep them bite-sized so that you can pop the whole thing in your mouth in one bite and not have to worry about them falling apart upon biting into them. If you make it too big, just pinch off a bit of rice and twist the temari back together again.

Strawberry Sushi

Hannah and I both loved these, and I was inspired to try out another long-dreamed-about recipe with her yesterday which also turned out delicious but needs a bit of tweaking before I can debut it here. Her visit is coming to an end soon (sadness!) but we’ve managed to cram in tons of great food memories that I’ll share with you soon too. Making food with friends is so much more fun!

Have you ever made sushi at home?

What flavor dessert sushi would you make?


post

Raw vegan mojito bites

I seem to develop a new food obsession every couple of months. I went through a period of intense and insatiable grapefruit lust a few months ago – there was nothing more delicious in the world to me than a ripe grapefruit at that time, and I ate one almost every day. Right now I’m in a berry bubble. If you haven’t noticed, berries have appeared on my blog a lot recently, and it’s because I’m absolutely obsessed with them nearly to the point of dependency.

My craving for berries is nowhere near over, but I’m starting to feel the intensity ease up a little now that the initial excitement from all this newly seasonal fruit has settled some. And right on cue, a new craving has emerged: Mint. Guys, I’m losing my mind over this stuff right now.

Raw Vegan Mojito Bites

The beautiful spring weather we’re having right now in Georgia (on the days it isn’t pouring down rain, at least) has me wistfully dreaming of sipping cocktails on patios in the sunshine. It won’t be long now before the bully that is summer in Georgia comes to scare away this brief moment of fair weather, replacing it with a beatdown of searing sun rays and suffocating chokehold of humidity. Of course I’m exaggerating, but only a little.

Anyway, we’ve been too busy for cocktails on patios lately, so I’ve been entertaining myself by recreating the flavor of one of my favorites at home, one that just so happens to feature my food obsession of the moment. Mmmmmmmojitos!

Raw Vegan Mojito Bites

The mojito is a mixture of rum and club soda, flavored with the refreshing additions of lime and mint that have been muddled with sugar. The flavor is so clean and crisp with the herbal aromas of lime zest and mint leaves scented throughout. The sugar never fully dissolves, and instead soaks up the other flavors, making for a sweet and flavorful sip with lots of texture.

These mojito bites are made with nothing more than nuts, dates, lime, mint, and agave to sweeten. I’ve rolled them in sugar to recreate that gritty undissolved sugar you get in the bottom of the glass – my favorite part. And guys, they really do taste like mojitos! It’s a perfect replica! Sans booze, of course.

Raw Vegan Mojito Bites

I’ve been keeping these in the refrigerator so I can enjoy them cold, just like a cocktail. Every bite is a burst of fresh mint and lime, and I especially love getting to lick the minty sugar off my fingers afterwards.

For a clutch of poppable minty snacks to curb your own cocktail cravings, follow these easy steps…

Raw vegan mojito bites

All the flavor of the classic summertime cocktail with none of the hangover.

Prep Time: 15 minutes

Yield: Makes 22 to 24 bites

Ingredients

  • 1 cup raw unsalted macadamia nuts
  • 1 cup raw unsalted cashews
  • 3/4 cup chopped dates
  • 3/4 cup fresh mint leaves
  • 4 tbsp. fresh-squeezed lime juice
  • the zest of 2 limes
  • 1 tsp. raw agave nectar
  • pinch salt
  • white sugar for rolling

Cooking Directions

  1. In a food processor, pulse together nuts until small. Add dates and pulse to combine.
  2. Add in mint, juice, zest, agave, and salt. Process until a paste is formed.
  3. Pinch off small bits of the paste and roll into balls. Roll balls in sugar.
  4. Store in an air-tight container in the refrigerator for up to 2 weeks.

Best part: No hangover!  Second best part: No straw clogged with mint leaves! Third best part: No giving yourself a headache trying to suck the mint leaves up through the straw! Fourth best part: No deciding it might work better to blow the mint back down the straw and having half the drink explode out of your glass as the mint shoots out of the straw like a cannon!

Just me? Ok.

Raw Vegan Mojito Bites

Oh, and they’re completely raw and vegan too. Nifty!

UPDATE: As a reader pointed out, white table sugar is usually not a raw or vegan product. Bone char, a product made from charring animal bones, is often used to de-colorize sugar for that bright white look. Even sugars labelled as raw often are not. Usually they are processed into white sugar before adding back some of the natural molasses to appear less processed. When making this recipe, I fully intended to use truly raw and vegan sugar but didn’t realize I was out of it until it was too late. I meant to say something about it but forgot. If it’s important to you that these snacks are indeed raw and vegan, be sure to read the labels on your sugar products carefully or omit altogether. Sucanat may be your best bet. It is a dehydrated sugar that retains all of it’s natural molasses, making it one of the least processed sugars available.

What flavors are you craving right now?

What cocktail would you like to have in a bite-sized treat?


post

Matcha bars with strawberry jam filling

Somehow it’s always the simplest recipes that manage to throw me for a loop.

Remember this line from my recent post on the photo shoot where I first made these supposedly simple matcha bars?..

“The bars were based on a similar recipe that I’ve made countless times, so I knew they’d turn out. The only thing I was really trying to figure out with this test was how much matcha to use and how long to bake them.”

Yeah, well, I ended up needing to make these 4 times to get them right. It cannot be said that I don’t care about you guys. I guess tasting 4 different versions of matcha bars wasn’t too bad though. 😉

Matcha bars

When I made them for Jimi at the photo shoot, they really did taste incredible. But it was clear that I’d over-baked them and I wondered if maybe omitting the almond meal would help the green tea flavor to stand out more. On my second attempt I replaced the almond meal with more flour and was pretty pleased with how the dough looked before baking. But then…I over-baked them again.

Matcha bars

Matcha bars

No matter! I’ll try again! And so I did with the same all-flour recipe and this time I managed to bake them correctly. Hooray!

But wait…this all-flour version is so dry. And the crumbles are the texture of sand, and the whole thing crumbles into a sandy mess when you try to take a forkful of it. On top of that, I hated the photos I had taken of it. The bars looked brown and drab, not bright and green and springy.

Matcha bars

And here we are, come round full circle to the original recipe, just not over-baked. Finally. I swear they really are easy to make, I totally made it hard on myself for no reason.

I hope you try them. The subtle grassy tea note is mellowed perfectly by the sweet jam. I love to eat them warm while the jam is still all molten and melty. They would be excellent as an Easter dessert or brunch pastry.

Matcha bars

Matcha bars

Matcha bars with strawberry jam filling

The springy green flavor of fine matcha tea contrasts with the sweetness of strawberries in this simple but stunning dessert.

Prep Time: 15 minutes

Cook Time: 40 minutes

Total Time: 55 minutes

Ingredients

  • 1 stick unsalted butter
  • 1/2 cup light brown sugar
  • 1/4 cup white sugar
  • 1 and 1/2 cups all-purpose flour
  • 1/2 cup ground almond meal
  • 2 tbsp. matcha powder
  • 1 tsp. baking powder
  • 1/4 tsp. salt
  • 1 large egg
  • 1/2 cup strawberry jam

Cooking Directions

  1. In a stand mixer, cream together room temperature butter with brown and white sugars.
  2. In a separate bowl, whisk together dry ingredients.
  3. Add half of the dry mixture to the wet and mix thoroughly. Add the egg and mix through.
  4. Pour in the last of the dry mix and mix until just combined.
  5. Remove the bowl from the mixer and scrape all excess dough off the sides and bottom with a spatula. Use your hands to finish mixing the dough.
  6. Add half of the dough to a buttered and floured 9-inch round or square baking dish and pat down with your hands until it covers the bottom. Add jam and spread across the surface with the back of a spoon. Crumble the remaining dough over the top of the jam in small pieces.
  7. Bake at 350F degrees for 40 minutes or until just starting to brown around the edges. Serve warm or cooled and store covered at room temperature for up to 5 days.

I’ve had a hard time finding matcha in regular grocery stores that isn’t either of terrible quality or terribly expensive. I saw a single ounce being sold at Whole foods for $28. I don’t care how organic or artisan or made of magic it was, that’s a sucker price. I’ve been buying the 4oz. bag of this matcha from Amazon(full disclosure: this is an affiliate link) for less than $10 and have been really pleased with it. It may not be high quality enough for drinking, but it’s plenty nice for baking. I store it in the freezer between uses to keep it fresh and it’s been just as good as the day I bought it for several months now.

Matcha bars

Mmmmm….jammy.

Have you ever baked with matcha (green tea powder) before?