Skip to Content

category

Category: Recipes

post

Gingery pear and apple sauce

Thanks for all the sweet and helpful comments on yesterday’s post.  I’m feeling happier and ready to jump back into sharing more delicious vegan recipes with you! I’ll start with this one: gingery pear and apple sauce…

I never really cared for applesauce that much as a kid.  I realize now that it might have had something to do with all the corn syrup and preservatives in store-bought jarred applesauces.  Blech.

I’ve made my own a couple times now and I’ve been very impressed both with how much better it tastes when you make it yourself and with how difficult it is to screw it up! With such a simple process for basic applesauce, I was sure I could toy around with making a fancier sauce pretty easily.

For this slurpable sauce you will need:

  • approx. 3 lbs. fruit (I used 4 large pears and 7 teeny tiny apples)
  • about a 2-inch piece of ginger
  • 1 lemon
  • up to a 1/4 cup brown sugar (based on how sweet you want it to be)
  • 2 tbsp. cinnamon
  • 1 tbsp. nutmeg
  • 1/4 tsp. ground clove

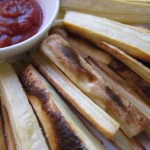
Start by running a peeler over the apples and pears.

Just look at all those peels! It took some time to get all that fruit naked!

Cut the fruit off the cores and into cubes and toss into the slow cooker. Add the zest and juice of half the lemon then add all your spices and sugar. If you don’t want it too sweet, don’t add the entire 1/4 cup of sugar, you can always add more later but you can’t subtract!

Cut the skin off the ginger and grate finely with a microplane directly into the pot. I used a piece of ginger this size, but of course, if you’re not that into ginger you can use less or none at all.

Toss with a spoon to distribute.

Cook on high for 6 hours or on low for 8 until everything is soft and sweet.

I then mashed mine with a potato masher and let it sit on the counter overnight to cool. You don’t have to wait though, you can skip straight to pureeing it while it’s still hot if you want.

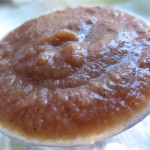
Just spoon it into a food processor and blitz it until it’s your desired consistency. I like mine smooth so I blend it for about 10 seconds or so, but if you want it chunky just pulse it a few times.

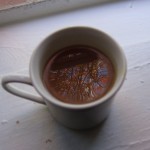
So sweet and slightly spicy from the ginger. I really reminds me of the wintery flavors of gingerbread.

This is scrumptious on just about anything: yogurt, ice cream, oatmeal, even on a peanut butter sandwich!

And it’s gonna make a ton, so go ahead and do what I did and put half of it in the freezer.

Gingery pear and apple sauce

A unique take on classic applesauce with pear and ginger.

Prep Time: 15 minutes

Cook Time: 6 hours

Total Time: 6 hours, 15 minutes

Yield: About 6 cups

Ingredients

  • approx. 3 lbs. fruit (I used 4 large pears and 7 small apples)
  • a 2 inch piece of ginger
  • zest and juice of 1 lemon
  • up to a 1/4 cup brown sugar
  • 2 tbsp. cinnamon
  • 1 tbsp. nutmeg
  • 1/4 tsp. ground clove

Cooking Directions

  1. Peel and core fruit and add to slow cooker.
  2. Grate over ginger and lemon zest.
  3. Add all other ingredients.
  4. Cook on high for 6 hours or on low for 8.
  5. Either serve as is or puree for 10 seconds in food processor for a smoother texture.

Now all I need to do is try to make my own apple butter! Mmmmmm…..

post

Cold cure drink to kick the sick

Well kids, I think I might be getting sick.

The strange thing is, I’m kind of excited about it in a way. No, I don’t enjoy wallowing in misery with a box of tissues in one hand and bowl of soup in the other, lying languidly on the couch watching bad day-time TV.

No, what I’m excited about is that I finally have a reason to share with you my recipe for a cure-all drink that I make whenever Jeff or I gets sick that manages to knock out our illnesses within 2 days every time. Yes, I have been waiting to get sick to share this recipe. My posts need context!

(Stuff you already know:  I’m not a doctor and though this drink may or may not make you feel better when you’re feeling icky, it is not meant to replace real medicine.)

Anyway, here it is in all its healing glory:

Cold cure drink

I make this drink anytime I'm feeling ill. Especially good for clearing up colds and sinus problems.

Prep Time: 5 minutes

Cook Time: 5 minutes

Total Time: 10 minutes

Ingredients

  • apple cider or juice
  • slices of lemons and/or oranges
  • a handful of cinnamon sticks
  • about 10 whole cloves
  • as much fresh grated ginger as you can stand (seriously, put a lot)
  • a tablespoon or two of maple syrup
  • 1/2 tsp. cayenne pepper (I got crazy and used red pepper flake too!)
  • 1/2 tsp. turmeric
  • 1 to 2 bags of your favorite tea (chai or black teas taste best in this)

Cooking Directions

  1. Heat everything up in a large pot and allow to simmer for several minutes.
  2. Either drink it strong as is or dilute with water as desired.

What you need to do is get a big pot and fill it 3/4 of the way with the cider and start bringing it up to a high simmer.  Add everything else and let it simmer for a few minutes.(I don’t know how long, just do it until the tea is steeped and you can smell that the cinnamon and clove have infused into the liquid.) Discard all the citrus slices, cinnamon sticks, cloves, and tea bags.

What you’ve just made is a very potent and intensely-flavored drink.  There are two methods for using it: either drink it as-is two to three times a day in a small quantity, or dilute the whole thing with lots of water and sip on it constantly all day.  Option one will really help to give you an immediate jolt to be able to face the day, option two is good if you have to force yourself to go to work so you can just take it in a travel mug and sip on it all day. It’s up to you what method will suit you better, I personally like to drink it strong once in the morning and once after dinner but not too close to bedtime.

Now, if you are really laid-up and don’t wanna crawl yourself to the store to acquire all of this stuff don’t worry, you can make an abbreviated version with just a few things. The absolute most important ingredients are the fresh ginger and cayenne pepper, and if you do nothing more than add a bit of those two things to a cup of tea, you’ll at least be on the right track.

The ginger does a few things: it calms your stomach so you don’t feel on the edge of puking all day, it snaps you awake without caffeine, and it will make you feel slightly more energized immediately. I know it sounds gross to put cayenne pepper in a beverage, but it’s really important! It helps to clear up mucous, not just in your nose but also in your stomach as that’s part of what makes your tummy feel nauseous in the first place.

The one I made today was insanely spicy because I put both cayenne pepper and red pepper flake in it. The spicier the better though. This ain’t a martini folks, it’s medicine!

I’m pretty sure this is not the kind of recipe they had in mind for Vegan MoFo, but since it is technically vegan and I am technically not making anything else today, it’ll just have to work.

Hope it’s as amazing and fantastic and magical for you as it has been for me!

post

Parsnip fries save the day! (sort of)

I’ve been interested in making the parsnip fries I keep hearing so much about from Caitlin of Healthy Tipping Point. I mean, we’ve all the had the original potato fries and sweet potato fries are becoming pretty common as well, so what is new and hip on the fry front these days??? Parsnip fries, that’s what!

More about those in a minute…

However, I thought that I would be really clever and develop an even newer, even cooler fry that would put all other fries to shame! And so I made…..daikon fries!

OH…MY…GAD!  These were easily one of the most disgusting things that I have ever had the misfortune of putting in my mouth! This is coming from someone who will try anything. Just don’t do it; I don’t think it was a factor of personal taste, I think these would be repugnant to nearly everyone.

So, with my epic daikon fry fail looming in the back of my mind, I decided that I must correct this with a tried and true fry that may not be new to everyone but was at least still new to me.

I took two parsnips and ran a peeler over them…

I then cut them into fry-sized sticks and tossed them with olive oil.

They were then placed on a non-stick baking sheet and sprinkled with salt.

I baked them at 400 degrees for 30 minutes until the edges were crispy and browned…

…and served them up alongside some ketchup to get the full fry effect.

It’s hard for me to explain how I felt about these. I would eat one and think “Mmmm, kinda sweet and earthy!” Then I would eat another one and think “Meh, these are weird,” and the two fries had tasted the same. Jeff and I ate all of them though, so I know I didn’t hate them. I think I just don’t like root vegetables that much.

If you’re planning on trying them for yourself, I’d suggest cutting out the core of the parsnip and discarding it as it was pretty tough and unpleasant to eat.

All in all, the parsnip fries were worlds better than my soggy, mushy, turnip and dirt flavored daikon fries, and they’re an interesting break from typical potato fries. If you know you love root vegetables, these might just be right up your alley.

Parsnip fries

Golden baked parsnip fries are an interesting alternative to everyday potato fries.

Prep Time: 10 minutes

Cook Time: 30 minutes

Total Time: 40 minutes

Ingredients

  • 2 parsnips
  • olive oil and salt to coat

Cooking Directions

  1. Peel, core, and slice parsnips into sticks.
  2. Toss in olive oil.
  3. Place on a non-stick baking sheet and sprinkle with salt.
  4. Bake at 400 degrees for 30 minutes or until golden brown.